Nextcloud is an open source solution for cloud storage similar to Dropbox and their competition. I described my rather complex install in a blog post a month ago, which also means that I’ve been using it for over a month now, and I am very happy with it. I simply love it. My solution was a little bit more complex with making it all in LVM RAID1. This time around I’ll be describing why do I like it so much, and how to simply install it on Fedora.
A Bunnycloud.
Why Nextcloud?
As I said it is an open source project with active community, formerly known as OwnCloud. The original authors have decided to run away and continue their work on their own under the name Nextcloud, why I do not know.
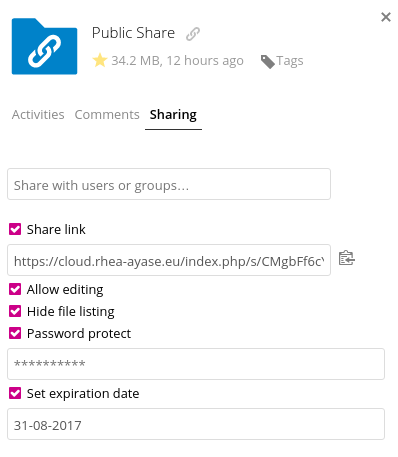
Shared link settings, with expiration, password protection, and uploading enabled.
Advantages
- All the mobile and desktop applications you would expect - Linux (packaged in Fedora,) Windows, Mac, Android, iOS and even F-Droid and Windows Mobile.
- Unlimited free storage space (depends on your hardware, and you have to pay electricity bill.)
- Use with your own domains. Example cloud.rhea-ayase.eu
- You can customize the looks, as I have Bunnycloud, without any reference to
nextcloud.comor any other advertisement being forced on you. - Share links protected by password.
- Share links with expiration date.
- Share links into which people can upload files for you.
- Share links of folders, into which people can not only upload files, but also download from. And they can be protected by password or have an expiration date.
Disadvantages
- You need your own hardware, RAID1 mirror recommended.
- You need stable internet connection to be able to use it outside of your home.
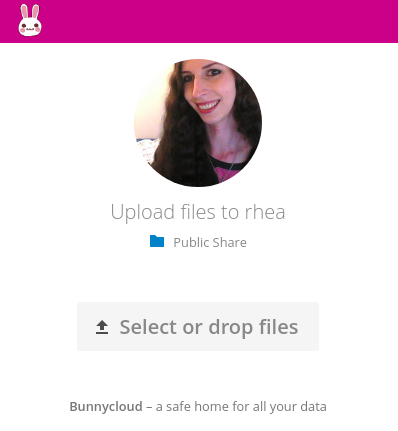
An upload folder shared by a link, as seen in a browser.
Installing Nextcloud on Fedora server
Installing Nextcloud on Fedora server can be as easy as running a single dnf command, but also very complicated. It all depends on how much do you want to deviate from the default configuration. In my case, I wanted to place everything on my raid1 volume, which I created after installing the server itself. In such a case you would want to peek into my other article how did I install it. Basically you would need to move the database over, and the data directories for nextcloud. It’s easy to figure out with basic administration understanding of Linux.
I will be using the vim editor and everything done via console, I will assume that you are SSH’d to the server. If you see any vim commands and you have any other preference, us whatever suits you better =)
For simple installation of Nextcloud you can follow these few instructions:
$ sudo dnf install httpd mariadb-server php nextcloud- All the things that we need (I’ve listed them explicitly to give you an idea what’s going on, although half of them would be installed as dependency.)- Create Firewall rules:
- Depending on the image that you’ve chosen, your system may or may not come with
firewalld. You can simply run$ sudo dnf install firewalldto make sure that you have it. If you just installed it, enable it:$ sudo systemctl enable --now firewalld $ sudo firewall-cmd --add-service=http && sudo firewall-cmd --add-service=https- Adds rules for http and https.$ sudo firewall-cmd --add-service=http --permanent && sudo firewall-cmd --add-service=https --permanent- Adds these rules permanently (persist through reboot)$ sudo firewall-cmd --list-all- list everything allowed by your firewall.
- Depending on the image that you’ve chosen, your system may or may not come with
- Configure MariaDB server:
$ sudo systemctl enable --now mariadb- Fire it up.$ mysql_secure_installation- Simple setup wizzard will walk you through some basic steps. Set your main root password for the thing, and answeryto everything else :Pmysql -u root -p- Log into your fancy SQL.create database nextcloud- Create the database.create user 'nextclouduser'@'localhost' identified by 'nextcloudpassword';- Create the user that will be used to access this database. Set up proper password though…grant all on nextcloud.* to 'nextclouduser'@'localhost';- Give our new user thenextclouddatabase.exit- Done. If you would like to move the database elsewhere, see the (already mentioned) instructions in my other article.sudo vim /etc/php.d/30-pdo_mysql.ini- Now we need to modify
; Enable pdo_mysql extension module
extension=pdo_mysql.so

[mysql]
mysql.allow_local_infile=On
mysql.allow_persistent=On
mysql.cache_size=2000
mysql.max_persistent=-1
mysql.max_links=-1
mysql.default_port=
mysql.default_socket=/var/lib/mysql/mysql.sock
mysql.default_host=127.0.0.1
mysql.default_user=
mysql.default_password=
mysql.connect_timeout=60
mysql.trace_mode=Off
- Nextcloud configuration
$ cd /usr/share/nextcloud/- Change to the Nextcloud directory.$ sudo -u apache php occ maintenance:install --data-dir /var/lib/nextcloud/data/ --database "mysql" --database-name "nextcloud" --database-user "nextclouduser" --database-pass "nextcloudpassword" --admin-user "admin" --admin-pass "adminpassword"- Run the install script with the right parameters for our database and create an admin account with specified username and password.- [optional] I also recommend installing an optional
php-pecl-apcupackage, which will allow us to use memory cache. To speed things up a little.$ sudo dnf install php-pecl-apcu $ sudo vim /usr/share/nextcloud/config/config.php- Make sure that the database is correctly configured.
- Change the
dbhostvalue fromlocalhostto127.0.0.1- a bug workaround of sort. - Add the IP address of your server, and/or any domains that you will use to access it, into the
trusted_domainsarray. - [optional] Enable the memory cache, installed in the above optional step, by adding this line:
'memcache.local' => '\\OC\\Memcache\\APCu', - [optional] Enable mod_rewrite to get rid of the
index.phpfrom your share links:'htaccess.RewriteBase' => '/',
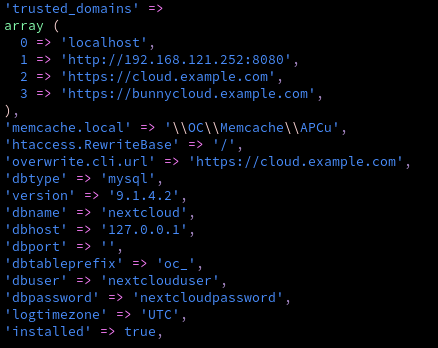
Snippet of the config.php contents.
- Apache configuration
- NextCloud does not come with pre-configured
vhost, which is a surprise to me, and simply defaults toexample.com/nextcloudinstead. So now to do this the right way, we should modify the install, however that may cause some update issues in the future, so lets create our own VHOST and leave the defaults there. $ sudo chown -R apache:apache /usr/share/nextcloud- Change the owner of our Nextcloud directory to theapache.$ sudo ln -s /etc/httpd/conf.d/nextcloud-access.conf.avail /etc/httpd/conf.d/z-nextcloud-access.conf- Allow Nextcloud access from any host.- Disable the default welcome page and stuff:
$ sudo mv /etc/httpd/conf.d/welcome.conf /etc/httpd/conf.d/welcome.conf-disabled$ sudo mv /etc/httpd/conf.d/userdir.conf /etc/httpd/conf.d/userdir.conf-disabled$ sudo mv /etc/httpd/conf.d/autoindex.conf /etc/httpd/conf.d/autoindex.conf-disabled
$ sudo vim /etc/httpd/conf.d/nextcloud-vhost.conf- Create our simplevhostwith the below contents, but exclude thevhost *:443if you will not use SSL. This also includes simple rewrite rule to get rid of the .php files. I set this one up manually due to some issues with Nextcloud’soccthat would be used otherwise.
- NextCloud does not come with pre-configured
<VirtualHost *:80>
  ServerName cloud.example.com
  ServerAlias 192.168.121.252
  ServerAdmin [email protected]
  DocumentRoot /usr/share/nextcloud

  ErrorLog logs/error-nextcloud.log
  CustomLog logs/access-nextcloud.log combined

  <IfModule mod_rewrite.c>
    RewriteEngine On

    RewriteCond %{REQUEST_FILENAME} !-f
    RewriteCond %{REQUEST_FILENAME} !-d
    RewriteRule ^(.*)$ index.php/$1 [L]
  </IfModule>
</VirtualHost>

<VirtualHost *:443>
  SSLEngine on

  ServerName cloud.example.com
  ServerAlias 192.168.121.252
  ServerAdmin [email protected]
  DocumentRoot /usr/share/nextcloud

  ErrorLog logs/error-nextcloud.log
  CustomLog logs/access-nextcloud.log combined

  <IfModule mod_rewrite.c>
    RewriteEngine On

    RewriteCond %{REQUEST_FILENAME} !-f
    RewriteCond %{REQUEST_FILENAME} !-d
    RewriteRule ^(.*)$ index.php/$1 [L]
  </IfModule>
</VirtualHost>

<Directory "/usr/share/nextcloud">
  Options Indexes FollowSymLinks
  AllowOverride All
  Require all granted
</Directory>

# vim: syntax=apache ts=4 sw=4 sts=4 sr noet
- Increase the PHP file limits in
$ sudo vim /etc/php.ini(My limits are a little bit over-board, tweak the below values to suit your needs.)post_max_size = 16Gupload_max_filesize = 16Gmax_file_uploads = 100
$ sudo systemctl enable --now httpd- fire up the Apache web server.
SSL
$ sudo dnf install mod_ssl openssl certbot - If you would like an SSL certificate for your cloud, you can use letsencrypt certbot.
$ sudo certbot certonly --webroot -w /usr/share/nextcloud -d cloud.example.com- will get a certificate for your domain. You can specify multiple domains with multiple-dparameters.- The certificates are located at SSLCertificateFile
/etc/letsencrypt/live/cloud.example.com. $ sudo vim /etc/httpd/conf.d/ssl.conf- Add or modify these two lines to use your new certificate:SSLCertificateFile /etc/letsencrypt/live/cloud.example.com/fullchain.pemSSLCertificateKeyFile /etc/letsencrypt/live/cloud.example.com/privkey.pem
- For basic server hardening you should at least disable these outdated protocols in
ssl.conf:SSLProtocol all -SSLv2 -SSLv3 -TLSv1SSLProxyProtocol all -SSLv2 -SSLv3 -TLSv1
Installing Nextcloud in Docker
I will just briefly mention that Nextcloud also provides a docker image on the Docker Hub.
Installing Nextcloud in OpenShift
You can use the above linked docker image in OpenShift as well, and this OpenShift Template will make it even easier.
Thanks!
=)